Wednesday, June 6, 2012

Fun! Fun! Funetti Cupcakes.

Who doesn't smile just a little when you see a cake or your favorite cupcakes covered in a variety of colored sprinkles? I know I do. I had some inspiration while I was researching recipes for the perfect vanilla cupcake and I came across some really yummy examples and motivated me to create something of my own..covered in sprinkles, of course.

I ended up using my old stand by vanilla cake recipe and its perfect and very simple to whip up if you need something yummy, like my daughter did, the night before she needed cupcakes and failed to warn me till the night before the event. So I decided to whip up some vanilla cupcakes using my very simple Vanilla cake recipe and dumped in a ton of sprinkles to add that little "smile" to the batter.


I love the little flecks of color it adds to the finished cupcake. Of course the cupcakes really wouldn't be really finished until I whipped up on of the best frosting's I have tried yet. I can only give the credit to an amazing baker who I admire and follow diligently. Her name is Rosie and she is the baker behind Sweetapolita a beautifully photographed and very delicious site to visit. I want to try everything on her blog.
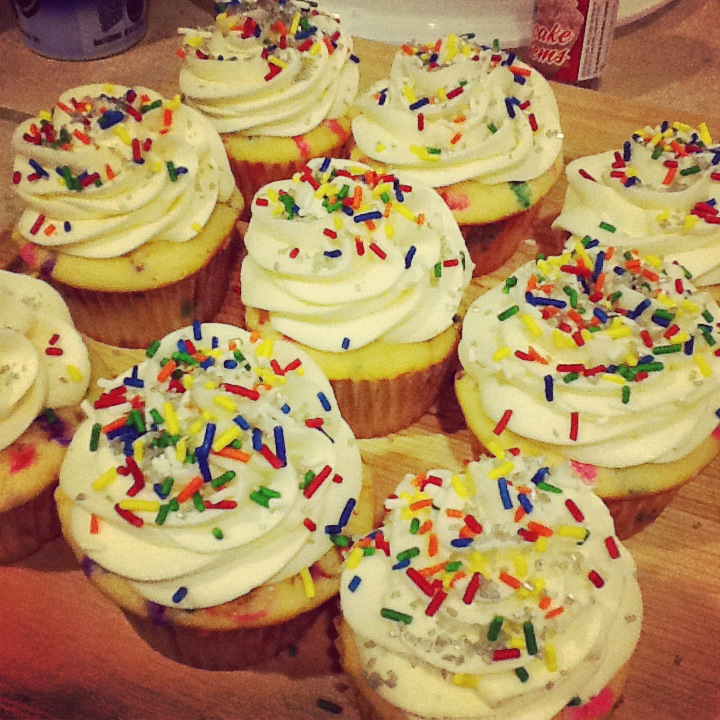
I swirled on the frosting and added more sprinkles to the tops. Who could resist all those sprinkles atop so much frosting! They were a hit with my daughter and her friends.

My very simple but delicious Vanilla cake recipe

Vanilla Bean Cake
Dry Ingredients:

2 3/4 cup flour

1 3/4 cups Vanilla bean sugar (vanilla bean infused sugar)or regular is fine

2 teaspoon baking powder

3/4 tsp salt

3/4 cup butter

5 egg whites

1 cup milk

2 teaspoons Vanilla

1/2 teaspoon almond ( I didn't have Almond extract,so I used Lemon)

Cream Butter.
Add eggs(whites) one at a time till combined
add milk~vanilla~almond or Lemon flavoring
Fill two 8 in rounds, greased and floured
325 deg. to 350
bake 20~30 min

Frost generously and enjoy!
~The Pastry Diva

Thursday, February 23, 2012

Flourless Peanut Butter Cookies.

Looking at the picture below you would never think these little beauties are made with only three ingredience, are super easy to make and are super addicting. Did I mention delicious too!


I came across this recipe a few months ago when I found out I had a sensitivity to wheat and gluten and I wanted something I could eat, share with friends and we would both enjoy. It's very simple ingredience include: an egg, peanut butter and sugar, three things you would normally have in your pantry anyway. Surprisingly,the texture of the cookie is very close to the original, and even enjoyed and devoured by the toughest cookie critic. You dont even need a mixer, just a large bowl, wooden spoon or just a large spoon to mix it all together. I mix my together and chill it in the refrigerater for about 10 to 15 min just to let it harden a bit so they are easier to roll into little balls. Give them a try you won't be disappointed.

~Flourless Peanut Butter cookies~

*1 large egg at room temperature
*1 cup of regular creamy Peanut butter (you could use crunchy if you want.I haven't tested this with organic or natural veriaties. I used Jiffy or any regular store brand.
*1 cup of granulated sugar ( more to the side to roll the cookies in before baking)

Mix these three ingredience together and chill for 15 min or longer if you want to make them at a
later date. Roll into 1 inch balls, roll in granulated sugar and place on a cookie sheet, 3 inches apart. Use a fork and press into the cookies the distictive criss-hatch design as you would with any peanut butter cookie. Place in oven for about 15 min. they will not change color very much so don't let them over cook. Take the pan out of the oven and let sit for 5 min on the cookie sheet. The cookies at this point will be very fragile so be very carefull placing them on a cooling rack. They will firm up and be the perfect texture when cool.

Enjoy,
The Pastry Diva

Wednesday, February 1, 2012

LePanier: An Amazing French Bakery!


If you are a fan of the most delicious French goodies, this is the place for you. It's located at the famous Pike Pace Market in Seattle. I am not sure how long its been here and as long as I have been visiting one of my favorite places,I can't believe I have missed such a delicious little gem. Passing this shop early in the morning you will notice the smell of buttery croissants, breads and pastries wafting through the air along with the sea air and the lingering smells of the market and the bustling of vendors setting up shop for the day.

When you open the door you are greeted with the sights and sounds of people starting their day with a little breakfast and the smell of fresh made espresso.

 Then you see this!!! Yes, a bountiful case filled with all that is buttery, fresh and flaky, filled and sweet!
 Tarts to for every flavor you could imagine
 I wish I had gotten a better picture of their lovely and decadent macaroons. They are too good to pass up, even for breakfast.....
and as you can see I never pass up a chance to order one with my croissant and my cafe Au lait.
So, If you are ever in my neck of the woods, look for this little gem and order something sweet!

lapanier.com


Enjoy!
The Pastry Diva

Monday, January 30, 2012

Small Batch Chocolate Vanilla Bean Latte Cupakes

When you need something to attach your sweet tooth, this recipe is perfect. It makes 4 to 5
perfect little cupcakes depending on how much you fill the cupcake cups. I filled them about
half and I got 6 perfect sized cupcakes.

Pretty good, huh!
I really love the pairing of the chocolate and coffee. I
used the recipe I found on this very talented baker from,
I really enjoy the beautiful food photography
and of course the goodies look amazing!
Her fondant roses are so pretty but I didn't have
the time so I just skipped that step but it would
sure add a little bit of pretty to these if you give them
as a gift or just impress your friends.

Enjoy!!
The Pastry Diva


Sunday, January 29, 2012

Snickers Cupcakes

Snickers Cupcakes with a surprise of little pieces of snickers and a drizzle of caramel hidden inside!


I know you want to lick your screen!
These are easy to make, I used the recipe I found
a great website, Annie's Eats 
I did change it up a bit by using a boxed cake mix, and a jarred caramel sauce. I know, I
try to use use the recipe as-is but with the time I had I
decided a mix would work and the result was very good.
These little gems are going out to my little brother who is celebrating
a birthday on Monday! I thought candy bar cupcakes would
be a favorite for my 20 something little brother!
Enjoy!

Thursday, November 10, 2011

Gearing up for the Fall Season with some Sweet Goodies!

This time of year has to me my favorite! I really enjoy the cooler weather and the last bits of sunshine before they disappear behind the clouds of  the winter rain and possibly snow. Today, I was checking over my calendar and noticed there are exactly two weeks till Thanksgiving and I thought it's about time we all start thinking about what we are going to make for the Holiday season dinners and parties. Here a few recipes I want to try this coming season! Enjoy!


Pumpkin Scones from The Baker Girl


Now this would definitely make me want to skip dinner and go straight to dessert.
Candy and Caramel Apple pie from She's Becoming Domestic


or you could delight your guests by serving this lovely looking cake!
Heaven and Hell Cake from Whisk Kid


If you enjoy a lighter dessert but still very impressive at your Thanksgiving meal,
My own Recipe for Pumpkin Mousse


Pumpkin Mousse


1 Pint of Whipping Cream

1/4 cup plus 2 Tablespoons of Splenda

1/2 cup of Pumpkin Puree

1 1/2 tsp pumpkin pie spice


Pour the whipping cream in to a mixer fitted with a whisk attachment . Turn on to med speed and whisk about 3 min. till the cream comes to a soft peak when you lift the whisk out of the bowl.Add remaining ingredients and whip till combined and the mixture is stiff. Don't over beat. Test the flavor and adjust the sweetness or the spice level to your liking. It is best to serve right away. But you can save it for later in the refrigerator, a late night snack maybe? Serves 4 small servings or 2 large.

Enjoy!!

The Pastry Diva

Monday, July 11, 2011

Chocolate Strawberry Ice Box Pie

This past week I was able to spend a week at a beach house for the 4th of July with Geoff,his Son and a family friend. It was a much needed time away from the world.  While planning our big 4th of July dinner I wanted to make a special dessert, like I always do when there is any kind of party or gathering.

 I had a limited supply of baking pans. I found a glass pie pan and decided I could modify it and still make it a very good dessert we could enjoy after our meal and while we watch the fireworks.


Here are the ingredients I used. If I was home making this I would have made real whip cream but the store bought whipped topping turned out to be very good. This is a great Semi-homemade recipe if you are having your own summer gathering.One note:Ignore the baked beans in the picture, they aren't part of the recipe, unless you WANT to be adventurous. NOT!!! Ha Ha!!

Chocolate Strawberry Ice Box Pie

2 1lb Packages of Strawberries
1 box of Famous Nabisco Chocolate Wafers
2 Tubs of Extra Creamy Whip cream
A Glass or metal pie pan

1.Wash and chop one of the containers of strawberries
2.Mix one tub of whip cream with the chopped strawberries and set aside
3.Line the pie plate with chocolate wafers using extra to cover any holes
4.Carefully spread the whip cream,strawberry mixture onto the wafers.
5.add another layer of chocolate layers over the top and spread the other tub of whipped topping over the wafers.
6.Slice a few more strawberries and decorate as desired
7.I crushed 4 or 5 left over wafers and sprinkled the crumbs over the top.

Chill in the refrigerator 4 hours or overnight.


Enjoy,
The Pastry Diva

Monday, June 20, 2011

Brioche

I have never been one to shy away from a challenge, so when I came across a recipe for brioche bread I decided I would give it a try. I have experience baking bread although I haven't really made any in a long time. King Arthur flour is a great site recourse for a wealth of baking information and if you leave a message or comment on any of their recipes and you had trouble with a recipe coming out right, they will respond with helpful suggestions on how to make the recipe better.

This recipe for Brioche look like it was going to be the one I wanted to try and after reading the reviews and comments it looked pretty good.


If you notice the picture of the dough rising the braided loaf didn't really retain its shape and turned out more like bread sticks then a loaf of bread. Oh well, you live and learn. I think that my kitchen wasn't warm enough to sufficiently let the dough rise enough. The braided loaf in the bread pan didn't raise enough but baked well and had a beautiful brown top. I am happy with the results but I guess next time I may let it rise in a warmer place longer? Since it baked well and the taste was very good I decided to use it to make French toast for dinner the next night.
The Kids loved it and I even made home made syrup.


I know even if it turn out "picture perfect" it did taste amazing for dinner the next night.

Enjoy,
The Pastry Diva

Sunday, June 12, 2011

Blackberry Blueberry Pie

Pie is something I grew up making. Weather it was a cream pie, fruit, or a savory chicken pot pie. The crust always intimidated me, I always thought it was a chore and i would just decide to use the boxed version which was loaded with ingredients that I couldn't pronounce and didn't really have any flavor. You just add water, it was very bland. So for this pie, I decided to search for a more flavorful and flaky crust recipe to compliment this fruit pie recipe. I found a recipe for pie crust that was very simple and included butter which, as everyone knows, butter always makes everything taste better. The trick to this crust is to make sure your ingredients are cold. I recommend measuring out all the dry ingredients into a blown, add the butter pieces and place in the refrigerator. That is the secret to an extra flaky crust.

Martha Stewart's Easy pie crust. It's very easy and if you have a food processor it takes seconds to whip extra to keep in your freezer for the next time you go to the farmers market and pick up some amazing Summer fruit available right now.


This was a very easy pie to make and I had a lot of fun making it. Oh, and it taste pretty good too. I followed the recipe I found on the Martha Stewart website but it was for a blueberry but knowing it was a berry pie,mixing it up with two cups of blackberries it would have the same outcome. One thing I learned about berry pie sit that if you aren't careful or add the right amount of thickeners ie: Flour,cornstarch. One or the other but I found the right combination in this recipe to come out with a pie that wasn't soupy. I found a great secret that helps in avoiding the soupy mess with the pie filling. The recipe calls for adding the sugar to the fruit. If you wait about 30min you will see that the fruit has become soupy, drain the extra juice off and continue with your recipe. Pretty simple.You may at this point want to add a little more sugar but only about 2 tablespoons of so. My filling was a little on the "not so sweet side" which had more of the natural fruit flavor then it being really set like some pis fillings can be.

Here are the only changes I made to this recipe:
*3 cups of frozen Blackberries
*2 cups of fresh Blueberries

Blueberry pie from Martha Stewart

With the combination of this very tasty,buttery crust and fruit filling, your family and you will be very happy with the outcome and the taste of this pie.


Enjoy
The Pastry Diva

Wednesday, June 8, 2011

So much sugar, so little time

Well here we go. I know it has been almost forever since I have posted here and I do apologise that i haven't kept up with the going's on around my kitchen here and around the "baking" world. I have been really busy baking,organizing and allot of other things that go into starting a baking business. Allot of which I have no knowledge about, so I have been reading,asking and trying to figure things out while I also  being busy with baking, writing and test recipes. I have had a really fun time coming up with new and tasty recipes to share with everyone and to hopefully add to my baking business.

I thought I would share with you a few things I have been baking up in my kitchen.
Cookies and cream cupcakes, Vanilla Bean with Pink White chocolate buttercream.


This is a sweet Jon Deere theme cupcakes with a Fondant cake I made with handmade fondant animals. Too cute!!


Vanilla Bean Bisotti and an all butter lemon Pound cake. Which I think would make a great cupcake, frosted with lemon butter cream? Yummy!

I found this recipe for the Pound Cake on the Martha Stewart web site and it turned out so good. I would definitely make it again.
There is a recipe link to the galze but I just mixed about 1 cup of Powered sugar and some lemon juice to the right consistency then I poked holes in the warm, not hot, cake and poured on the glaze and let it seep into the holes.

Enjoy,
The Pastry Diva

Wednesday, June 6, 2012

Fun! Fun! Funetti Cupcakes.

Who doesn't smile just a little when you see a cake or your favorite cupcakes covered in a variety of colored sprinkles? I know I do. I had some inspiration while I was researching recipes for the perfect vanilla cupcake and I came across some really yummy examples and motivated me to create something of my own..covered in sprinkles, of course.

I ended up using my old stand by vanilla cake recipe and its perfect and very simple to whip up if you need something yummy, like my daughter did, the night before she needed cupcakes and failed to warn me till the night before the event. So I decided to whip up some vanilla cupcakes using my very simple Vanilla cake recipe and dumped in a ton of sprinkles to add that little "smile" to the batter.


I love the little flecks of color it adds to the finished cupcake. Of course the cupcakes really wouldn't be really finished until I whipped up on of the best frosting's I have tried yet. I can only give the credit to an amazing baker who I admire and follow diligently. Her name is Rosie and she is the baker behind Sweetapolita a beautifully photographed and very delicious site to visit. I want to try everything on her blog.

I swirled on the frosting and added more sprinkles to the tops. Who could resist all those sprinkles atop so much frosting! They were a hit with my daughter and her friends.

My very simple but delicious Vanilla cake recipe

Vanilla Bean Cake
Dry Ingredients:

2 3/4 cup flour

1 3/4 cups Vanilla bean sugar (vanilla bean infused sugar)or regular is fine

2 teaspoon baking powder

3/4 tsp salt

3/4 cup butter

5 egg whites

1 cup milk

2 teaspoons Vanilla

1/2 teaspoon almond ( I didn't have Almond extract,so I used Lemon)

Cream Butter.
Add eggs(whites) one at a time till combined
add milk~vanilla~almond or Lemon flavoring
Fill two 8 in rounds, greased and floured
325 deg. to 350
bake 20~30 min

Frost generously and enjoy!
~The Pastry Diva

Thursday, February 23, 2012

Flourless Peanut Butter Cookies.

Looking at the picture below you would never think these little beauties are made with only three ingredience, are super easy to make and are super addicting. Did I mention delicious too!


I came across this recipe a few months ago when I found out I had a sensitivity to wheat and gluten and I wanted something I could eat, share with friends and we would both enjoy. It's very simple ingredience include: an egg, peanut butter and sugar, three things you would normally have in your pantry anyway. Surprisingly,the texture of the cookie is very close to the original, and even enjoyed and devoured by the toughest cookie critic. You dont even need a mixer, just a large bowl, wooden spoon or just a large spoon to mix it all together. I mix my together and chill it in the refrigerater for about 10 to 15 min just to let it harden a bit so they are easier to roll into little balls. Give them a try you won't be disappointed.

~Flourless Peanut Butter cookies~

*1 large egg at room temperature
*1 cup of regular creamy Peanut butter (you could use crunchy if you want.I haven't tested this with organic or natural veriaties. I used Jiffy or any regular store brand.
*1 cup of granulated sugar ( more to the side to roll the cookies in before baking)

Mix these three ingredience together and chill for 15 min or longer if you want to make them at a
later date. Roll into 1 inch balls, roll in granulated sugar and place on a cookie sheet, 3 inches apart. Use a fork and press into the cookies the distictive criss-hatch design as you would with any peanut butter cookie. Place in oven for about 15 min. they will not change color very much so don't let them over cook. Take the pan out of the oven and let sit for 5 min on the cookie sheet. The cookies at this point will be very fragile so be very carefull placing them on a cooling rack. They will firm up and be the perfect texture when cool.

Enjoy,
The Pastry Diva

Wednesday, February 1, 2012

LePanier: An Amazing French Bakery!


If you are a fan of the most delicious French goodies, this is the place for you. It's located at the famous Pike Pace Market in Seattle. I am not sure how long its been here and as long as I have been visiting one of my favorite places,I can't believe I have missed such a delicious little gem. Passing this shop early in the morning you will notice the smell of buttery croissants, breads and pastries wafting through the air along with the sea air and the lingering smells of the market and the bustling of vendors setting up shop for the day.

When you open the door you are greeted with the sights and sounds of people starting their day with a little breakfast and the smell of fresh made espresso.

 Then you see this!!! Yes, a bountiful case filled with all that is buttery, fresh and flaky, filled and sweet!
 Tarts to for every flavor you could imagine
 I wish I had gotten a better picture of their lovely and decadent macaroons. They are too good to pass up, even for breakfast.....
and as you can see I never pass up a chance to order one with my croissant and my cafe Au lait.
So, If you are ever in my neck of the woods, look for this little gem and order something sweet!

lapanier.com


Enjoy!
The Pastry Diva

Monday, January 30, 2012

Small Batch Chocolate Vanilla Bean Latte Cupakes

When you need something to attach your sweet tooth, this recipe is perfect. It makes 4 to 5
perfect little cupcakes depending on how much you fill the cupcake cups. I filled them about
half and I got 6 perfect sized cupcakes.

Pretty good, huh!
I really love the pairing of the chocolate and coffee. I
used the recipe I found on this very talented baker from,
I really enjoy the beautiful food photography
and of course the goodies look amazing!
Her fondant roses are so pretty but I didn't have
the time so I just skipped that step but it would
sure add a little bit of pretty to these if you give them
as a gift or just impress your friends.

Enjoy!!
The Pastry Diva


Sunday, January 29, 2012

Snickers Cupcakes

Snickers Cupcakes with a surprise of little pieces of snickers and a drizzle of caramel hidden inside!


I know you want to lick your screen!
These are easy to make, I used the recipe I found
a great website, Annie's Eats 
I did change it up a bit by using a boxed cake mix, and a jarred caramel sauce. I know, I
try to use use the recipe as-is but with the time I had I
decided a mix would work and the result was very good.
These little gems are going out to my little brother who is celebrating
a birthday on Monday! I thought candy bar cupcakes would
be a favorite for my 20 something little brother!
Enjoy!

Thursday, November 10, 2011

Gearing up for the Fall Season with some Sweet Goodies!

This time of year has to me my favorite! I really enjoy the cooler weather and the last bits of sunshine before they disappear behind the clouds of  the winter rain and possibly snow. Today, I was checking over my calendar and noticed there are exactly two weeks till Thanksgiving and I thought it's about time we all start thinking about what we are going to make for the Holiday season dinners and parties. Here a few recipes I want to try this coming season! Enjoy!


Pumpkin Scones from The Baker Girl


Now this would definitely make me want to skip dinner and go straight to dessert.
Candy and Caramel Apple pie from She's Becoming Domestic


or you could delight your guests by serving this lovely looking cake!
Heaven and Hell Cake from Whisk Kid


If you enjoy a lighter dessert but still very impressive at your Thanksgiving meal,
My own Recipe for Pumpkin Mousse


Pumpkin Mousse


1 Pint of Whipping Cream

1/4 cup plus 2 Tablespoons of Splenda

1/2 cup of Pumpkin Puree

1 1/2 tsp pumpkin pie spice


Pour the whipping cream in to a mixer fitted with a whisk attachment . Turn on to med speed and whisk about 3 min. till the cream comes to a soft peak when you lift the whisk out of the bowl.Add remaining ingredients and whip till combined and the mixture is stiff. Don't over beat. Test the flavor and adjust the sweetness or the spice level to your liking. It is best to serve right away. But you can save it for later in the refrigerator, a late night snack maybe? Serves 4 small servings or 2 large.

Enjoy!!

The Pastry Diva

Monday, July 11, 2011

Chocolate Strawberry Ice Box Pie

This past week I was able to spend a week at a beach house for the 4th of July with Geoff,his Son and a family friend. It was a much needed time away from the world.  While planning our big 4th of July dinner I wanted to make a special dessert, like I always do when there is any kind of party or gathering.

 I had a limited supply of baking pans. I found a glass pie pan and decided I could modify it and still make it a very good dessert we could enjoy after our meal and while we watch the fireworks.


Here are the ingredients I used. If I was home making this I would have made real whip cream but the store bought whipped topping turned out to be very good. This is a great Semi-homemade recipe if you are having your own summer gathering.One note:Ignore the baked beans in the picture, they aren't part of the recipe, unless you WANT to be adventurous. NOT!!! Ha Ha!!

Chocolate Strawberry Ice Box Pie

2 1lb Packages of Strawberries
1 box of Famous Nabisco Chocolate Wafers
2 Tubs of Extra Creamy Whip cream
A Glass or metal pie pan

1.Wash and chop one of the containers of strawberries
2.Mix one tub of whip cream with the chopped strawberries and set aside
3.Line the pie plate with chocolate wafers using extra to cover any holes
4.Carefully spread the whip cream,strawberry mixture onto the wafers.
5.add another layer of chocolate layers over the top and spread the other tub of whipped topping over the wafers.
6.Slice a few more strawberries and decorate as desired
7.I crushed 4 or 5 left over wafers and sprinkled the crumbs over the top.

Chill in the refrigerator 4 hours or overnight.


Enjoy,
The Pastry Diva

Monday, June 20, 2011

Brioche

I have never been one to shy away from a challenge, so when I came across a recipe for brioche bread I decided I would give it a try. I have experience baking bread although I haven't really made any in a long time. King Arthur flour is a great site recourse for a wealth of baking information and if you leave a message or comment on any of their recipes and you had trouble with a recipe coming out right, they will respond with helpful suggestions on how to make the recipe better.

This recipe for Brioche look like it was going to be the one I wanted to try and after reading the reviews and comments it looked pretty good.


If you notice the picture of the dough rising the braided loaf didn't really retain its shape and turned out more like bread sticks then a loaf of bread. Oh well, you live and learn. I think that my kitchen wasn't warm enough to sufficiently let the dough rise enough. The braided loaf in the bread pan didn't raise enough but baked well and had a beautiful brown top. I am happy with the results but I guess next time I may let it rise in a warmer place longer? Since it baked well and the taste was very good I decided to use it to make French toast for dinner the next night.
The Kids loved it and I even made home made syrup.


I know even if it turn out "picture perfect" it did taste amazing for dinner the next night.

Enjoy,
The Pastry Diva

Sunday, June 12, 2011

Blackberry Blueberry Pie

Pie is something I grew up making. Weather it was a cream pie, fruit, or a savory chicken pot pie. The crust always intimidated me, I always thought it was a chore and i would just decide to use the boxed version which was loaded with ingredients that I couldn't pronounce and didn't really have any flavor. You just add water, it was very bland. So for this pie, I decided to search for a more flavorful and flaky crust recipe to compliment this fruit pie recipe. I found a recipe for pie crust that was very simple and included butter which, as everyone knows, butter always makes everything taste better. The trick to this crust is to make sure your ingredients are cold. I recommend measuring out all the dry ingredients into a blown, add the butter pieces and place in the refrigerator. That is the secret to an extra flaky crust.

Martha Stewart's Easy pie crust. It's very easy and if you have a food processor it takes seconds to whip extra to keep in your freezer for the next time you go to the farmers market and pick up some amazing Summer fruit available right now.


This was a very easy pie to make and I had a lot of fun making it. Oh, and it taste pretty good too. I followed the recipe I found on the Martha Stewart website but it was for a blueberry but knowing it was a berry pie,mixing it up with two cups of blackberries it would have the same outcome. One thing I learned about berry pie sit that if you aren't careful or add the right amount of thickeners ie: Flour,cornstarch. One or the other but I found the right combination in this recipe to come out with a pie that wasn't soupy. I found a great secret that helps in avoiding the soupy mess with the pie filling. The recipe calls for adding the sugar to the fruit. If you wait about 30min you will see that the fruit has become soupy, drain the extra juice off and continue with your recipe. Pretty simple.You may at this point want to add a little more sugar but only about 2 tablespoons of so. My filling was a little on the "not so sweet side" which had more of the natural fruit flavor then it being really set like some pis fillings can be.

Here are the only changes I made to this recipe:
*3 cups of frozen Blackberries
*2 cups of fresh Blueberries

Blueberry pie from Martha Stewart

With the combination of this very tasty,buttery crust and fruit filling, your family and you will be very happy with the outcome and the taste of this pie.


Enjoy
The Pastry Diva

Wednesday, June 8, 2011

So much sugar, so little time

Well here we go. I know it has been almost forever since I have posted here and I do apologise that i haven't kept up with the going's on around my kitchen here and around the "baking" world. I have been really busy baking,organizing and allot of other things that go into starting a baking business. Allot of which I have no knowledge about, so I have been reading,asking and trying to figure things out while I also  being busy with baking, writing and test recipes. I have had a really fun time coming up with new and tasty recipes to share with everyone and to hopefully add to my baking business.

I thought I would share with you a few things I have been baking up in my kitchen.
Cookies and cream cupcakes, Vanilla Bean with Pink White chocolate buttercream.


This is a sweet Jon Deere theme cupcakes with a Fondant cake I made with handmade fondant animals. Too cute!!


Vanilla Bean Bisotti and an all butter lemon Pound cake. Which I think would make a great cupcake, frosted with lemon butter cream? Yummy!

I found this recipe for the Pound Cake on the Martha Stewart web site and it turned out so good. I would definitely make it again.
There is a recipe link to the galze but I just mixed about 1 cup of Powered sugar and some lemon juice to the right consistency then I poked holes in the warm, not hot, cake and poured on the glaze and let it seep into the holes.

Enjoy,
The Pastry Diva

LinkWithin

Related Posts Plugin for WordPress, Blogger...